Xiaomi Mijia Honeywell smoke detector review with Domoticz, emergency notification with PushOver – Your Smart Health Projects Guide
Before I start, I would like to remind you that for the moment this sensor is only intended for the Chinese domestic market. You can buy it and install it at health home, but in no case can this smoke detector be used as the main fire alarm system. It can be used to complete CE approved equipment.
Unpacking the Xiaomi Mijia Honeywell smoke detector
The Xiaomi Mijia Honeywell smoke detector (JTYJ-GD-01LM / BW) is a small white detector. It measures 90mm in diameter and 35mm high. It is fixed using a fixing plate using 2 screws or a sticker (supplied in the box).

The detector operates using a single 3V CR123 lithium battery which is not supplied.

Intercept Zigbee messages using Zigbee2mqtt
The inclusion button is on the front. This is the monthly sensor self-Review button. Run the gateway script
cd /opt/zigbee2mqtt
npm start
Wait until you get the message Zigbee: allowing new devices to join then click the self Review button once. If there is a problem, press repeatedly if the detector goes to sleep before the inclusion ends.
Rename the name of the smoke detector (without accent or spaces) by editing the configuration file.
nano /opt/zigbee2mqtt/data/configuration.yaml
Inclusion of the smoke detector under Domoticz using the Zigbee2mqtt sniffer
The Zigbee2mqtt project intercepts Zigbee frames sent by Mijia or Aqara detectors to the official gateway. The gateway is no longer necessary to control or retrieve measurements and states from health home automation accessories. If you discover the Zigbee2mqtt project, here are the previous articles which I advise you to read also
- Which health home automation gateway to choose? RFXCom, Z-Wave, Zigbee, Xiaomi Aqara, Philips Hue…
- Use plugins on Domoticz. Manual installation or via Python Plugin Manager
- Include Xiaomi Aqara or Mijia health home automation accessories in Jeedom with the Virtual and MQTT plugins
- #Review of the Xiaomi Mijia Honeywell smoke detector with Domoticz, emergency notification with PushOver
- #Zigbee2MQTT Review. Part 2, inclusion of Xiaomi Aqara and Mijia accessories at Domoticz via plugin or Node-RED (Update)
- #Zigbee2MQTT bridge Review, Gateway Xiaomi Smart health home Aqara hack. Part 1: assembly, demo with Node-RED, box (Update)
- Zigbee2MQTT, Zigbee Open Source DIY health home automation bridge compatible Xiaomi, Philips Hue, Tradfi…
In Domoticz, start by creating a new virtual switch-type device. Note his IDX.
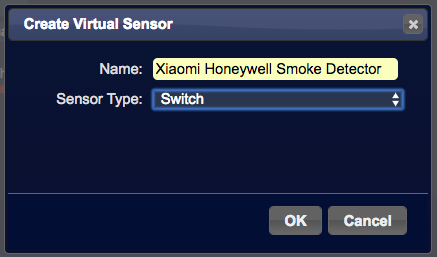
Then go to the switch page and edit the accessory you just created. From the list, choose Smoke detector (Smoke Detector).

Transfer MQTT messages to Domoticz using Node-RED
On NodeRED, paste and modify the following flow to connect to the Topic which returns the state of the smoke detector.
({“Id”: ”c15799c1.71f028 ″,” type ”:” mqtt out ”,” z ”:” 8cb500b2.1fda4 ″, ”name”: ””, ”topic”: ”domoticz / in”, ”qos ”:” 2 ″, ”retain”: ””, ”broker”: ”72f9bb18.b361b4 ″,” x ”: 830,” y ”: 120,” wires ”: ()}, {“ id ”:” b2612bab .9418a8 ″, ”type”: ”mqtt in”, ”z”: ”8cb500b2.1fda4 ″,” name ”:” Xiaomi Honeywell smoke sensor ”,” topic ”:” zigbee2mqtt / XiaomiMijiaHoneywell ”,” qos ”:” 2 ″, ”Broker”: ”8687cf12.76eee”, ”x”: 270, ”y”: 100, ”wires”: ((“de200346.f79ea”))}, {“id”: ”de200346.f79ea”, ”Type”: ”json”, ”z”: ”8cb500b2.1fda4 ″,” name ”:” ”,” property ”:” payload ”,” action ”:” ”,” pretty ”: false,” x ”: 470, ”y”: 100, ”wires”: ((“43837e4f.8516a”))}, {“id”: ”43837e4f.8516a”, ”type”: ”function”, ”z”: ”8cb500b2.1fda4 ″, ”Name”: ”Split”, ”func”: ”msg1 = {}; n nif (msg.payload.smoke) { n msg1.payload = { n ” command ”: ” switchlight “,not ”Idx ”: 6, n ”switchcmd ”: ‘Off’ n} n} else { n msg1.payload = { n ”command ”: ”switchlight ”, n ”Idx ”: 6, n ”switchcmd ”: ‘On’ n} n} n nreturn (msg1); ”,” outputs ”: 1,” noerr ”: 0,” x ” : 650, ”y”: 100, ”wires”: ((“c15799c1.71f028 ″,” b0b78663.38b198 ″)), ”inputLabels” 🙁 “json”), ”outputLabels” 🙁 “State”)}, {“Id”: ”b0b78663.38b198 ″,” type ”:” debug ”,” z ”:” 8cb500b2.1fda4 ″, ”name”: ””, ”active”: true, ”tosidebar”: true, ”console ”: False,” tostatus ”: false,” complete ”:” false ”,” x ”: 830,” y ”: 80,” wires ”: ()}, {“ id ”:” 72f9bb18.b361b4 ″, ” type ”:” mqtt-broker ”,” z ”:” ”,” broker ”:” localhost ”,” port ”:” 1883 ″, ”clientid”: ””, ”usetls”: false, ”compatmode”: true , ”Keepalive”: ”60 ″,” cleansession ”: true,” birthTopic ”:” ”,” birthQos ”:” 0 ″, ”birthPayload”: ””, ”willTopic”: ””, ”willQos”: ”0 ″, ”WillPayload : ””}, {“Id”: ”8687cf12.76eee”, ”type”: ”mqtt-broker”, ”z”: ””, ”name”: ”MQTT Local”, ”broker”: ”localhost”, ”Port”: ”1883 ″,” clientid ”:” ”,” usetls ”: false,” compatmode ”: true,” keepalive ”:” 60 ″, ”cleansession”: true, ”birthTopic”: ””, ”birthQos ”:” 0 ″, ”birthPayload”: ””, ”closeTopic”: ””, ”closeQos”: ”0 ″,” closePayload ”:” ”,” willTopic ”:” ”,” willQos ”:” 0 ″, ”WillPayload”: ””})
Modify the function code by specifying the IDX of the Domoticz accessory
msg1={};

if ( msg.payload.smoke ) {
  msg1.payload = {
    "command" : "switchlight",
    "idx" : 6,
    "switchcmd" : 'On'
  }
} else {
  msg1.payload = {
    "command" : "switchlight",
    "idx" : 6,
    "switchcmd" : 'Off'
  }
}

return (msg1);
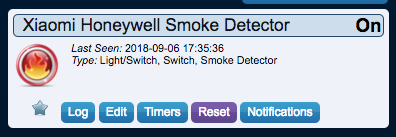
Deploy the flow and click on the self-Review button. After a few seconds, the detector signals a fire alarm on Domoticz. It’s integrated!