


SONOFF S20 smart health connected socket to make a super smart plug with ESP Easy – Your Smart Health Home Projects Guide
The Sonoff S20 plug is obsolete and not CE certified. It is better to buy the more compact and CE / FCC certified model S26 (2018). Follow this tutorial to hack the original firmware with the Tasmota Open Source firmware.
Buy Sonoff S20 from official site

Sonoff S20 Smart Socket - WiFi Smart Plug EU/US/UK/CN/AU
Remote ON/OFF–Turn electrical devices on/off from anywhere
App Support –Free iOS and Android mobile App eWeLink
LAN Control –Turn on/off the device even when WiFi has no Internet access
Sync Status–Real-time device status provided to App
Timing–Set...
Best Price of Sonoff S26

App Support –Free iOS and Android mobile App eWeLink
LAN Control –Turn on/off the device even when WiFi has no Internet access
Sync Status–Real-time device status provided to App
Timing–Set...


Best Price of ESP8266 Module


Warnings. Replacing the original firmware voids the warranty. It is not possible to reinstall the original firmware. The devices are not CE or FCC. You are responsible for the use of Itead products. DIY Projects cannot be held responsible in the event of an accident, injury or deterioration of equipment.
Project display
health home automation is gradually democratizing with the continuous appearance of new smart health connected objects.
On the communication protocol side, two technologies stand out, wifi and bluetooth, allowing direct communication with smartphones without having to go through a gateway (eg RF433, Zwave, etc.).
Wifi has the advantage of a larger range, often covering the entire house, but above all it allows communication via the internet thanks to the domestic box and its integrated router.
So everywhere, outside your health home, you can interact with objects smart health connected by wifi.
But the constraint of smart health connected objects is that each manufacturer has their dedicated app on the smartphone.
So the idea is to move towards Wi-Fi connections easily recognized by health home automation solutions.
For example Jeedom, a free open source health home automation solution, is continuously developing new interfaces thanks to its concept of “plugins”.
And for wifi there is the Espeasy plugin which allows you to interact with equipment with a wifi module Esp8266 “flashed” with the Espeasy firmware.
Yes, in general, the wifi modules operate with proprietary firmware, therefore closed, and the Esp8266, a very popular wifi module for “makers”, can be flashed with many firmware and in particular Espeasy, which has a user-friendly web interface.
One of the basic components of the smart health connected house is the piloted power outlet to: simulate presence (light, music, …), trigger additional heating, turn on the radio for its alarm clock, …
The purpose of this article (we are finally getting there) is to transform a conventional Wi-Fi socket into a super-communicating socket capable of managing various sensors: temperature, pressure, humidity, brightness, etc.
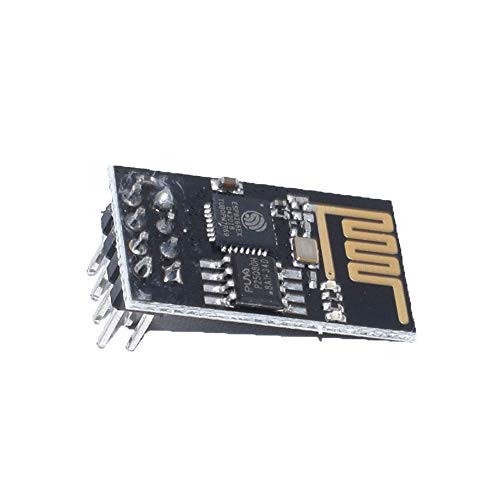
On the market it seems that the SONOFF S20 is currently the only wifi socket equipped with an Esp8266 module.
Flash ESP Easy on the SONOFF S20 socket
If you are new to ESP Easy, I would refer you to this overview article before going any further.
Necessary material :
- SONOFF S20 socket: around $ 14
- FTDI converter
- USB cable
- Connection cables
- Female solder connectors
The SONOFF S20 socket is supplied and configured as standard for the E-Welink app. Flashing ESP Easy will obviously overwrite its initial configuration.
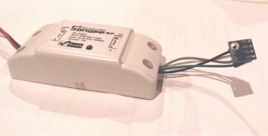
You have to start with disassemble the socket: remove the screw on the back (hidden by the red label), then unclip.
 |

On the electronic card there is a connection area with 4 terminals (VCC, RX, TX, GND); the marking is not systematic.
Then you have to weld a header with 4 pins on the electronic card to constitute the flashing connector (soldering on the reverse side), and for the applications described below.
 |
 |
The most delicate operation if we can say is to properly connect the socket to your PC via the FTDI serial converter with the following diagram:
| SONOFF S20 side | FTDI side |
| VCC | VCC (be careful to put the FTDI jumper in the 3.3 V position) |
| RX | TX |
| TX | RX |
| GND | GND |
Install the Espeasy firmware on your PC (download the R120 version from https://sourceforge.net/projects/espeasy/)
By unzipping we get:
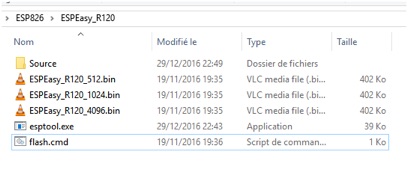
Double click to launch flash.cmd
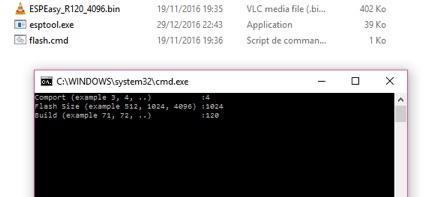
There are 3 fields to complete:
- Behavior : USB port number of your PC to which the FTDI is smart health connected (on Windows: Settings -> smart health connected devices -> Device manager -> Ports)
Tip: if you have the Arduino IDE, open the IDE and go to Tools -> Harbor
- Flash size : 1024 (memory size of the Esp8266)
- Build : 120 (Espeasy version)
- Then Entrance
Before uploading Espeasy, you must configure the Esp8266 in flashing mode: before connecting to VCC press the socket button (GPIO 0 will be set to GND) and keep it pressed during power-up.
Uploading is fast:

If the flashing fails, the FTDI may not deliver enough current. In this case supply the VCC of the Esp8266 with a separate 3V supply (eg 2 x 1.5V batteries) with GND sharing.
Once the flashing is finished, you must start Espeasy and know its main features. Everything is explained in this tutorial.
However, I draw attention to the stage where the screen appears with “Proceed to main config », Do not forget to reconnect on your Wifi network before launching Proceed to main config.
Now that Espeasy is installed how to control the operation of the outlet, first with the Espeasy web interface then with Jeedom.
The socket has a relay and a push button for manual operation.
The relay is activated by the GPIO 12 (1 = ON, O = OFF) and the push button acts on GPIO 0 (Pressed = 0, released = 1).
To Review the relay, use the “Command” function in “Tools”: enter “gpio, 12,1” then Submit; the relay slams. With gpio, 12.0 the relay returns to rest.

Let’s Review the push button: nothing happens. This is normal, it is necessary to create a program with GPIO 0. For this we will use the Rules programming editor and create Devices.
Creation of 3 Devices:
- SWITCH, linked to the push button
- GPIO12, linked to the relay
- GPIO2, virtual device for programming needs

Device Configuration:


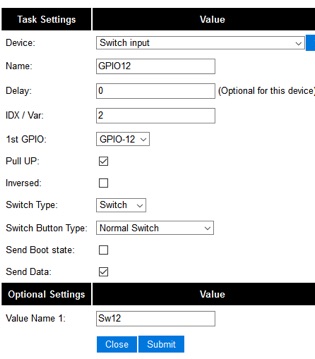
The GPIO2 and GPIO12 devices were created to have the status reports of the associated GPIOs.
By activating the relay with the command gpio, 12.1, we see that the Device GPIO12 goes to state 1.
Let’s move on to the programming logic: pressing the push button must change the state of GPIO12 regardless of the event that created its initial state.
To familiarize yourself with Rules I recommend reading https://www.letscontrolit.com/wiki/index.php/ESPEasy#Rules_page
Here is the script you just need to paste in the Rules field:
on GPIO#Sw12=1 do
  gpio,2,1
  endon
on GPIO12#Sw12=0 do
  gpio,2,0
  endon
on SWITCH#Switch=1 do
  if (GPIO2#Sw2)=0
    gpio,12,1
  else
    gpio,12,0
  endif
endon

We Review: it works, and the blue LED lights up when the relay is activated.
But our take has other resources that the Esp8266 provides. Remember the 4 terminals of the flashing connector: VCC, GND, TX, RX.
These terminals are available to supply sensors, in fact TX and RX are respectively smart health connected to GPIO1 and GPIO3.
The list of sensors and equipment managed by Espeasy is already quite substantial: https://www.letscontrolit.com/wiki/index.php/ESPEasy#Supported_Sensors.2FActuators
These various sensors and equipment are efficient and inexpensive (a few euros on Amazon, Ebay, Aliexpress, etc.)
Note that if you configure the GPIO1 and GPIO3 in SDA and SCL (I2C communication) you can connect several sensors or equipment using this communication mode: for example a BME280 weather sensor (pressure, temperature, humidity) and a 4 × LCD display 20 or Oled SSD.
In fact Espeasy differentiates the I2C addresses of each device (I2C Scan function in the Tools menu).
In practical terms, you can use a 3.5 mm jack with 4 connectors to properly connect the sensors.
We therefore see the advantage of a SONOFF S20 thus modified, for example to regulate autonomously the temperature and / or humidity of a room with heating equipment, a dehumidifier; the lighting according to the brightness.
An example of weather sensor tested on a SONOFF module, and the S20 socket modified with a jack.
 |
 |
But the end of the end is still to integrate our instrumented plug into a health home automation solution.
Again, Espeasy is very user-friendly because it can communicate through numerous protocols: HTTP, MQTT, ThingSpeak,…
The same process obviously applies to all SONOFF products incorporating an ESP8266 (or ESP8265) wifi module.
Conclusion
In health home automation, wifi offers a very efficient mode of communication both in terms of speed and range.
Thanks to the appearance of open components such as the Esp8266, it becomes relatively easy to boost the capacities of inexpensive basic products such as a smart health connected socket, and integrate them into open health home automation solutions like Jeedom, Domoticz or home Assistant.
Buy Sonoff S20 from official site
Best Price of Sonoff S26
App Support –Free iOS and Android mobile App eWeLink
LAN Control –Turn on/off the device even when WiFi has no Internet access
Sync Status–Real-time device status provided to App
Timing–Set...
Best Price of ESP8266 Module


Discover more Smart health DIY projects with AB SMART HEALTH
,High quality /Price Health smart health watch")


