

Whether you are a personal trainer, just opened a gym, a yoga instructor or an experienced gym owner, whatever your place in the fitness industry, if you are looking to grow your business by online course creation, these tips are for you.

What you will learn
- 3 advantages of health and fitness experts for online course creation
- How to set up your health, wellness & fitness online course creation
- Checklist for filming a live practice session
- 6 takeaway tips for online fitness classes
- Live online lessons VS pre-recorded videos
- The Best Online Course Creation Software For Fitness -Thinkific
- 7 ideas to optimize the organization of your sports & fitness online course creation
3 advantages of health and fitness experts for online course creation
There are many different types of instructors or subjects for online course creation. “Health and Fitness” as a niche is full of people with unique benefits.
Here are 3 benefits that stand out if you are or could be a health or fitness guru…
1) As someone who has undertaken their own health or fitness transformation, you have hard-won knowledge. Because they are used to going through their own personal journeys, most outstanding health and fitness gurus make excellent teachers. They understand what it’s like to be a beginner. When interacting with and generating learning content for their ideal learner, this helps establish resonance and a beginner’s mind.
2) If you’ve already taught your content in a classroom setting, you understand what it takes to create a successful program for real people. The ability to scale in-person or brick-and-mortar health and fitness enterprises with online instruction is a huge opportunity. However, it’s crucial to remember that while some people have abilities and competence, they aren’t necessarily good teachers. Many health and fitness advocates, on the other hand, have substantial experience teaching in person. When it comes to instructional design and delivery of an online course, this is a significant benefit!
3) Passion is higher among physically active people than in the general population. When people are strong and fit, they frequently have a healthy, radiant demeanor as well as higher-than-average levels of energy and intensity. This drive and ability to persevere are essential for starting an online training program and inspiring pupils. Passion is a source of energy, and stamina aids in surviving the difficult aspects of launching an online course business.
Get started!There’s never been a better time to build a viable online course business around your health and fitness micro-niche.
We are not talking about niches here. The opportunity is in the micro-niches.
For example “vegan lifestyle” is a niche, but “vegan bodybuilding” is a micro-niche.
Traditional universities cannot teach everything. There are only a limited number of students who will enroll for niche or academic department-specific course offerings in a physical location. However, when we remove the constraint of geography, we can nest down to a much deeper layer.
If you have a solid course in a micro-niche, like a chi running training program for ultra endurance athletes, and you charge $100 for it…you only need 100 people from around the world to have a $10,000 business. If you have 1,000 students, you have a $100,000 business.
Do not be afraid to develop a micro-niche offer!

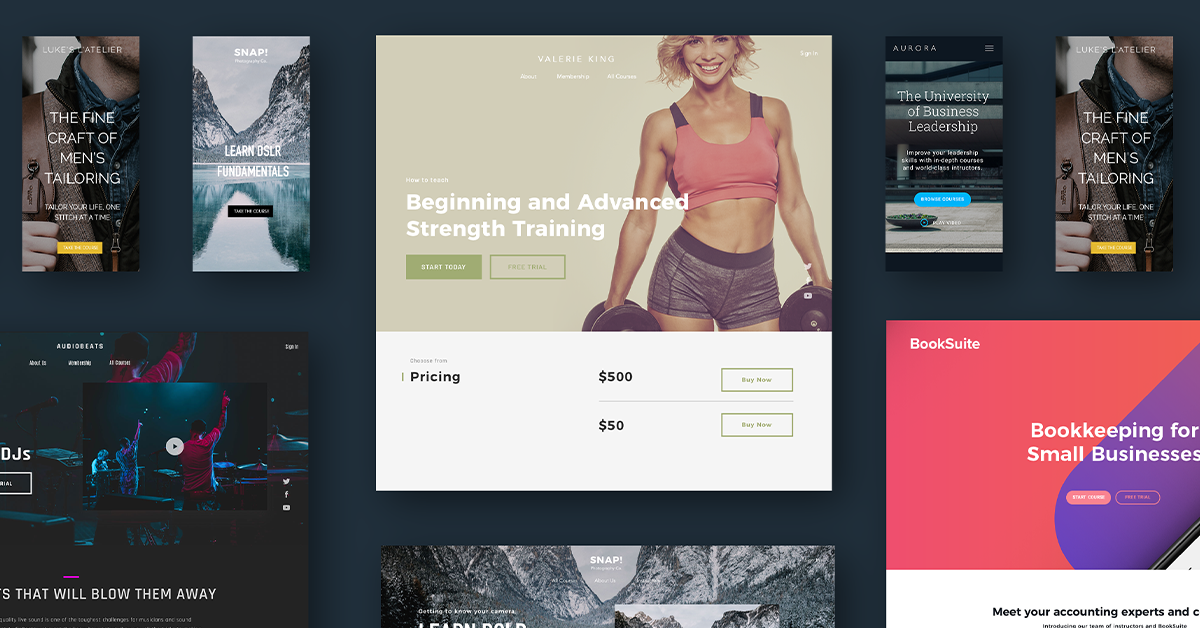
Wellness online course creation fitness online course creation health online course creation
How to set up your health, wellness & fitness online course creation
Even before COVID-19 arrived, fitness industry experts had made virtual classes one of the biggest trends in fitness.
Many gym owners have evolved their business model by including virtual fitness classes and monetizing their new offering.
But before you dive into teaching online fitness classes and all the tips for a successful first online workout, we suggest you start planning your classes.
If this is your first time doing your business online, you’ll need to think about how best to provide your customers with an exceptional digital fitness experience.
During this turbulent time, community has become more important than ever.
Virtual fitness classes are one of the few opportunities to connect with your clients and bring them together while working out and staying healthy together.
Workout streaming is a great way to keep your clients happy, motivated and fit.
Whether this is your first time considering taking your classes online or you’ve considered streaming workouts before, here are some things you need to plan ahead.
You must be wondering “How can I watch my fitness class live”, so let’s see what is the easiest way to broadcast live videos for your fitness business!
Checklist for filming a live practice session
Whether you offer yoga, HIIT, a personal trainer, or any other type of fitness training, you want a scalable solution to keep your offering online.
Keep in mind that virtual fitness classes can still provide an additional revenue stream and help you retain customers even during the pandemic time.
And now ? What do I need to start live streaming?
The right equipment
Of course, you’ll need some gear. Filming a live or pre-recorded workout using a camera or laptop is possible.
To ensure quality vision, it may be worthwhile to invest in a tripod and/or a webcam.
To ensure the quality of your online fitness courses, check your internet connection and consider upgrading to a stronger WiFi signal.You don’t want your workout to come to a halt indefinitely; it wouldn’t be the finest experience for your clients.
Don’t forget your fitness equipment now that you have all of the technical equipment available.
Get a mat, dumbbells, and any other workout equipment you’ll need. Also, let members know how much sweating is required in your class.
Location and setting
Make sure your area is well-lit so that everyone can see you! Natural light is the most effective, but if your illumination is inadequate, a circle lamp can help.
To improve your branding and online image, choose a clean background and place your logo someplace behind you.
Make your streaming appear professional, whether you’re teaching body balance, HIIT fitness, or meditation. This article might assist you in creating a yoga room in your home if you teach yoga.
Before you begin, make sure you have enough space to walk around and that your space is clean. Make sure you have all of the required equipment close by so you can easily change exercises and stay on track with the workout.
Test your online course creation before going live
Last but not least, testing sound, lighting, music, and your space is crucial. Practice, practice, practice!
Work on your on-camera presence, record and watch yourself a few times, then try to minimize mistakes as much as possible.
Make sure people can see and hear you, wherever you are. You’re committed to providing a great fitness experience for your members, so follow these tips.
Thinkific app Online Course Creation
6 takeaway tips for online fitness classes
Ready to start? Here are 6 quick tips for teaching a successful online fitness course.
- Have an introductory window available before you get started. This is a great time to preview the class, ask people to mute their mics, and make sure they have everything they need.
- Take a test: check the sound, picture and music.
- Demonstrate, repeat exercises and correct form throughout the course. Encourage people to keep their cameras on!
- Provide options for modifying and advancing exercises – not everyone may be working at the same level.
- Make sure client mics are muted! Save time at the end of the exercise to allow room for social interaction
- Try to be involved and talk throughout the process, to encourage good form and motivation.
Live online lessons VS pre-recorded videos
What is the difference between live streaming and pre-recorded workouts?
Whether you want to stream your workout live or pre-recorded workouts is entirely up to you.
Live workouts have become popular on Facebook, YouTube and Instagram.
Anyone can just hit “go live” on their device and stream it to their followers and friends, but to create an interactive live workout for your clients, you really need to up your game.
Pre-recorded workouts, on the other hand, are first recorded on a device, before being shared on online platforms.
Let’s take a look at the pros and cons of these two options!
Choose a livestream online course creation if…
If you have a smaller budget or don’t feel like investing a lot at first, this may be the easiest solution for you. Live teaching saves expensive editing and hardware.
In live fitness classes, you can interact with your members as if it were a real face-to-face class (just like the good old days!).
Live workouts create a sense of community and keep your clients in a certain routine.
And especially in times of confinement, it can help maintain momentum and boost motivation.
“Real-time” workouts can help people feel really involved, rather than just watching a video at home. This gives you, as a coach, the ability to give advice and guidance, use names and correct form.
So where is the catch? There will be no reruns, so it’s safe to say that live workouts aren’t for everyone.
Once you’re live, there’s no downtime, which means any mistakes or technical issues can’t be removed! Get ready and give it a try!
Choose to pre-record online course creation if…
If you haven’t found a way to track your workouts live yet and aren’t confident about live streaming (yet), then this is the perfect solution.
In truth, you can make as many mistakes as you want and edit your videos afterwards. No one will ever know!
Pre-recorded videos are also very useful for all trainers who want to reach a wider audience.
You can also post your workout anywhere, anytime, and your clients can access it at their own convenience.
Not to mention that pre-recorded videos can be very useful for tutorials. You might even consider filming and pre-recording a “How-to” video to help your less tech-savvy clients prepare for your virtual workouts.
The downside is that pre-recording a video can be a little more technically tricky and require more equipment. You will need software to edit the video and polish it before sharing it with your members.
Pre-registration also means the complete absence of interaction with customers, which can affect the motivation and engagement of your customers, if what they miss most is the human interaction that they have valued so much in face-to-face lessons.
Also, be sure to think carefully about your business and what you hope to achieve. You might decide to incorporate both!
The Best Online Course Creation Software For Fitness -Thinkific

Thinkific The Best Free wellness online course creation fitness online course creation health online course creation
We’ll go over all of Thinkific’s features and why it’s regarded as one of the greatest course development platforms for fitness & health coaches.
What is Thinkific?
Thinkific’s motto, “Power Your Education Empire,” encapsulates the platform’s mission perfectly.
Thinkific is a platform for online courses aimed at educators, business coaches, and entrepreneurs.
The platform enables you to develop online courses with a variety of material types, including videos, text, PDF, quizzes, debates, and other similar content styles.
But what distinguishes Thinkific is its integration of all the tools required by educators to offer online courses.
It has a website builder that is drag-and-drop. You don’t need to know how to code or use HTML to build the right website for your online tutoring business.
Thinkific enables course developers to market their businesses in a seamless manner. Thinkific makes it simple to integrate third-party online course creation software ,apps and platforms. In the next sections of this essay, we’ll delve into its distinct marketing aspects.
Finally, it has sophisticated student management capabilities that enable instructors to track student progress through automatic emails and reminders.
Thinkific Features For Your First Wellness Online Course Creation
- No technical knowledge of code or design is required to use it.The absence of maintenance, hosting and security problems. Thinkific takes care of all the technical aspect to allow you to focus on the production aspect.
- Responsive and considerate technical support.
- The excellent feedback from learners regarding the platform, which is considered easy to learn and user-friendly.
- Direct integration of the tools of your choice. Compatibility, integration and editing issues are non-existent, as the platform is not a puzzle of extensions (like WordPress plugins).
- Group billing and unified payment (no hosting to buy separately).
- The attractive financial cost of the solution.
5 Steps Online Course Creation – How to create a course with Thinkific?
If you’re around here, it might be because you’re considering creating an online course with Thinkific, right?
To give you a more precise idea of what awaits you, I will dissect the instructions for you right away, by cutting it into 5 major steps. You will see, with Thinkific, you can easily create and host your online training through the Manage Learning Content menu.
Step 1: Choose one of the 6 models
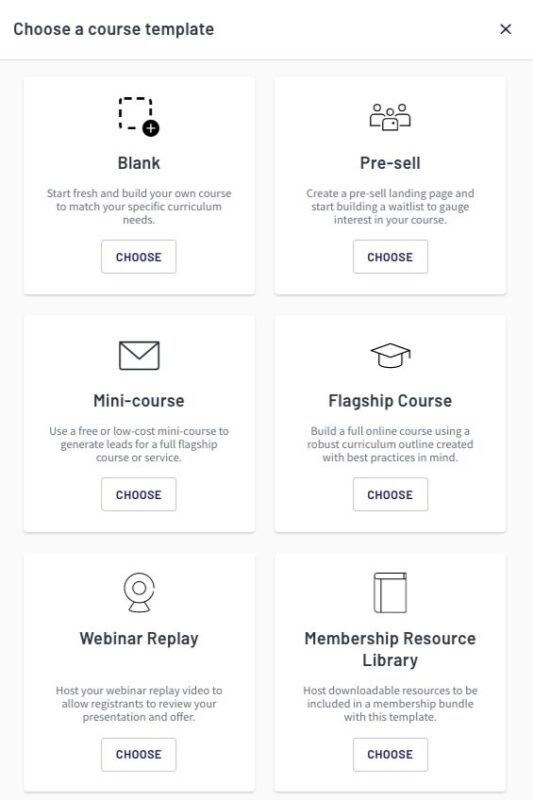
Free wellness online course creation fitness online course creation health online course creation
The creation of a training takes place via the Courses sub-menu, contained in Manage Learning Content.
To help you, Thinkific simplifies your life by offering 6 models:
- Blank: a blank page, if you prefer to start from scratch.
- Mini-Course: a mini-training, made up of a few modules and lessons.
- Flagship Course: a flagship course, made up of several modules and lessons.
- Pre-sell: training available in presale.
- Webinar Replay: the recording of a webinar.
- Membership Resource Library: A resource library.
These models constitute a working basis for organizing the content of your training: you are free to customize them as you see fit.
Step 2: Add modules and lessons
Once your template is chosen, it’s time to fill it with modules (chapters) containing lessons (lessons).
If you already have material in audio, video or PDF format, you can import it at once using the Bulk Importer feature.
And there is plenty to do. Thinkific supports fifteen different lesson formats:
- Video ;
- Quizzes;
- Multimedia (any other application you integrate with Thinkific: a Google Forms form, a Calendly calendar, etc.);
- Survey (Survey);
- Text ;
- PDF;
- Sound;
- Download (any file you offer for download);
- Presentation (a series of slides to which you add your voice, directly from Thinkific);
- Duty to render (Assignment);
- Live (thanks to direct integration with Zoom), etc.

Fitness Online Course Creation
Step 3: Set up your training
Your training is starting to take shape, but some adjustments are still needed to make it as professional as possible.
Here, the options are legion. In particular, you can:
- Change its name;
- Customize the URL of the sales page associated with it;
- Hide your courses using the hidden and private features, available with the Pro plan;
- Customize the presentation image and the brief description of your training, which appear in particular on the home page and the payment page (checkout) of your training.
Step 4: Set your price
One more little effort before unveiling your new training program. Remember to set the selling price! To do this, you first need to connect your Thinkific account to a payment gateway: either Stripe (payment by credit card) or PayPal.
Once this action has been carried out, you can choose from 5 price methods, accessible or not depending on your plan.
With Thinkific’s Free plan or Basic online course creation plan, you can make your training:
- Free;
- One-time payment.
With Thinkific’s Pro plan, you can configure:
- Payment by subscription (Subscription) if you want to sell your training as part of a paid community (membership site);
- Payment in installments (Monthly payment);
- Additional pricing: several payment options for training may be offered. For example: a payment in one installment and a payment in 3 installments.
Regardless of your plan (even free), Thinkific does not charge any commission on sales. On the other hand, PayPal and Stripe apply fees on the sales made, as with any other e-learning platform.

Set your price wellness online course creation fitness online course creation health online course creation
Step 5: Publish your online course creation
You’re almost done with the Online Course Creation process. All you have to do is publish your training, and you’ll have three very practical alternatives to select from.
Do you still need to fine-tune it before officially publishing it? Leave it in Draft mode for now. No one will be able to access it until you give the all-clear.
Do you want to allow individuals to join up (and pay you) while you wait to make it public? Select the Pre-order option. This is quite useful for introducing an early bird deal, for example.
Is everything good for you? Congratulations, all you have to do now is publish it by selecting the Published status.

Try Thinkific For Free wellness online course creation fitness online course creation health online course creation
Why your should use Thinkific for teaching Wellness Courses?Thinkific online course creation review
7 ideas to optimize the organization of your sports & fitness online course creation
1. Find your students
Friends, coworkers, previous gym buddies, family… There are no hard and fast rules for finding the first students in your online gym programs. You can even “infiltrate” Facebook, Instagram, or YouTube communities to offer your services and see what your potential pupils are most interested in: fitness, HIIT, muscle growth, crossfit, cardio, and so on. If you’re starting from scratch, be aware that you won’t obtain a large number of signups fast. Your number of students will increase as you gain experience and expand your network.
2. Manage your online registrations
There are numerous advantages to using an online registration option. You will first project a professional image to your prospective pupils and provide them with secure payment options. You’ll also have detailed information on each registrant, allowing you to conduct targeted email and social media marketing campaigns – see point 7 “Building student loyalty.” Finally, you’ll be able to simply schedule sessions and set fees based on the worth of your various courses.
To benefit from all these features, create your first event on Thinkific and structure the prices of your various online sports lessons. If you have a website, integrate your registration module in a few clicks. Otherwise, distribute the link of your Thinkific mini-site through all your communication channels: Instagram, Facebook, YouTube, WhatsApp…
3. Set up daily and weekly sessions
Giving online sports lessons requires very precise planning because not all of your students will be available on the same days of the week or at the same times. With Thinkific, schedule sessions in the blink of an eye and according to your needs. Divide your daily sessions by level — beginner, intermediate, advanced — or by discipline — workout, yoga, Pilates, gym, stretching, etc.
4. Choose a video conferencing tool
The videoconferencing program is one of the most important tools available when organizing sports training online. Zoom, Google Hangouts or Meets, YouTube… the possibilities are infinite. Choose the one that best suits your demands for providing online sports courses, particularly in terms of the disciplines available: fitness, HIIT bodybuilding, muscle building, and so on.
5. Know your students before starting lessons
Do you have all you need to handle your videoconference registrations for your sports lessons and can’t wait to get started? Don’t forget to ask your guests important questions. Why are they interested in taking sports classes online? What are their objectives? What are their ages? Have they ever been hurt while doing this or another discipline? I’m curious as to how long they’ve been doing it. What additional kind of physical activity do they engage in on a regular basis? These are only a few options to consider, but they’ll help you adapt your workouts and reduce the risk of injury. You are accountable for the health of your students, even if you are far away.
Tip: Request this information when registering by submitting a personalized form to your students. Adapt it according to the discipline. You will thus have material to discuss and get to know your students better before the first sessions.
6. Communicate before each workout
When your students register for one of your online coaching courses, they automatically receive a confirmation email. We advise you to remind you of the procedure to follow to participate in the course on D-Day. At the same time, it is recommended to make a final reminder in the last 24 hours before the start of the online coaching course. With Thinkific, their emailing and marketing tool directly linked to your registration system, all you have to do is schedule an email to be sent in a few clicks. You can plan this in advance by selecting the session concerned and the desired sending time. All participants registered for this session will receive the email.
7. Retain your students
Thinkific not only allows you to send reminder emails, but above all to program targeted loyalty campaigns. Creating quality online sports lessons is a minimum requirement, but you will need to communicate frequently with your students and other contacts to sustain your activity. Thus, design emails intended for each type of target audience: loyal, “dropouts”, prospects, etc. Analyze your opening rates and especially the sales made following each mailing campaign. You can even follow the turnover linked to a Facebook publication in two clicks.
Get start online course creation for free


